
QuickBooks Online stands as a cornerstone for countless businesses, offering a comprehensive suite of tools for finance, payroll, and billing management.
Its robust platform supports businesses in streamlining invoicing, payment reconciliation, and achieving financial clarity.
However, the journey with QuickBooks Online may not be perpetual for every user. Understanding how to cancel QuickBooks Online becomes crucial when your business’s needs evolve, or alternative solutions become more aligned with your goals.
In this guide, we’ll provide you with a clear roadmap of the cancellation process.
Before jumping into the cancellation steps, let’s first explore why you might want to cancel your QuickBooks subscription.
Reasons for Canceling QuickBooks Online
Deciding to cancel a QuickBooks Online subscription often stems from various factors that reflect a business’s evolving needs and goals. While QuickBooks Online is a robust platform for finance and payroll management, several reasons might prompt users to reconsider their subscriptions.
Changing Business Needs
As businesses evolve, their requirements for accounting software can change. What once was a perfect fit might no longer serve the growing or shifting demands of your company, prompting a need for a platform with different functionalities.
Cost Consideration
The ongoing cost of a QuickBooks Online subscription can be a significant factor, especially for small businesses or startups keeping a close eye on their expenses. Users might seek more cost-effective solutions that offer similar services at a lower price point.
Alternative Software Options
The market is full of accounting software alternatives, each with unique features and benefits. Businesses might find another software that better fits their specific needs, such as industry-specific functionalities or more user-friendly interfaces.
Complexity and Usability
Some users find QuickBooks Online too complex for their needs, preferring a simpler solution that doesn’t require a steep learning curve or extensive training to use effectively.
Integration Issues
For businesses that rely heavily on seamless integration between their accounting software and other operational tools, any limitations in QuickBooks Online’s integration capabilities can be a deal-breaker. Finding a platform that offers better compatibility with their ecosystem can prompt a switch.
Pre-Cancellation Preparation
Before you hit “cancel subscription” on your QuickBooks Online account, a bit of groundwork is essential.
First off, backing up your data is crucial. Ensure all your financial records, payroll data, and billing information are securely saved. This step protects your business’s history and makes a transition smoother.
Next, loop in your team or any stakeholders. A quick heads-up ensures everyone’s on the same page, preventing any surprises or disruptions in workflow.
In another vein, take a moment to pore over your subscription plan details. Are you in the middle of an annual subscription?
Understanding the specifics can help you navigate potential refunds or the unused portion of your service. This evaluation helps in making an informed decision, ensuring you’re not leaving money on the table when you decide to cancel your QuickBooks online subscription.
Step-by-Step Guide to Canceling QuickBooks Online
Below is an easy-to-follow guide to ensure a smooth cancellation process:
- Start by logging into your QuickBooks Online account to initiate the cancellation process.
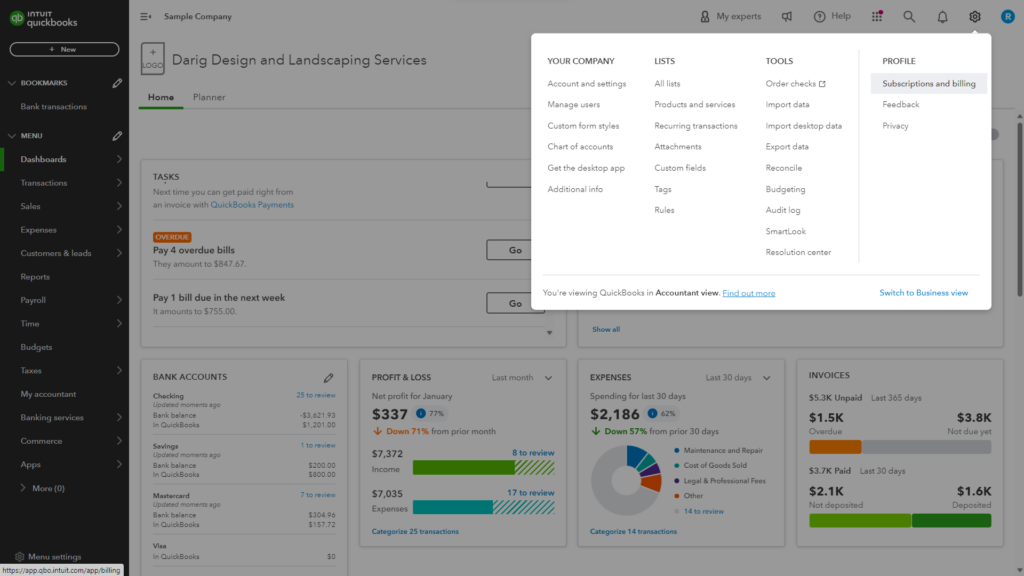
- Click on the gear icon, located at the top-right corner of the page, to access the settings menu.
- Within the “Profile” column select “Subscriptions and billing”. Here, you’ll see the option to “Cancel subscription” or “Cancel online” on the right-hand side.
- Click on “Cancel subscription” or “Cancel online.” If prompted, click “Continue to cancel,” then “Continue to cancel” again to proceed.
- Follow the on-screen instructions, which may include clicking “Submit and cancel subscription.”
Note: if you’re using QuickBooks Payments, you’ll have to cancel your Payments account separately. Here’s how to cancel your QuickBooks Payments subscription.
Understanding QuickBooks Online Cancellation Policies
When you decide to cancel your QuickBooks Online subscription, it’s essential to grasp the nuances of their cancellation policies.
QuickBooks offers a clear approach to refunds, outstanding balances, and data access post-cancellation. If you’re within an annual subscription, you might be eligible for a refund for the unused portion of your service, depending on the specifics of your billing cycle and the timing of your cancellation.
Addressing any outstanding balances is a necessary step before cancellation to ensure a seamless transition. QuickBooks facilitates this through your online account settings, allowing for straightforward management of any dues.
Most importantly, QuickBooks values your data. Post-cancellation, whether from a paid or trial subscription, QuickBooks retains your data for one year in a read-only format.
This thoughtful feature means you can resume exactly where you left off should you decide to return. After this period, your data is permanently deleted, underscoring the importance of backing up the information you wish to keep.
Common Challenges and Troubleshooting
Are you encountering hurdles while trying to cancel your QuickBooks online subscription? It’s not uncommon to face cancellation errors or subscription-related issues.
If you stumble upon a glitch or can’t find the cancel subscription link, don’t fret. Simply double-check your online account details and ensure you’re following the correct easy steps for cancellation. Sometimes, simply refreshing your browser or logging out and back into your QuickBooks account can resolve these snags.
If challenges persist, QuickBooks’ customer support service is your go-to resource. They’re equipped to handle everything from billing subscription queries to more intricate subscription or access issues.
Post-Cancellation Checklist
After you’ve canceled your QuickBooks subscription, don’t just close the book yet. A few key actions will ensure everything is wrapped up neatly.
Confirmation of Cancelation
Verify you’ve received a cancellation confirmation. This can come as an email directly from QuickBooks, confirming your subscription has been successfully canceled.
Data Management Post-Cancellation
QuickBooks holds onto your data for a year in a read-only format, but if you’re keen on having it securely removed sooner, reach out to customer support to discuss your options. This ensures your information remains confidential and is handled according to your preferences.
Notifying Your Team
Communicating the changes with your team, especially if they rely on QuickBooks for daily operations, is vital. A quick meeting or an email update can keep everyone informed and ready to adapt to new tools or processes. This step maintains transparency and ensures a smooth transition for your team’s workflow.
Conclusion: Navigating Your QuickBooks Online Cancellation
In wrapping up, canceling your QuickBooks Online subscription is a decision that shouldn’t be taken lightly.
We’ve walked through the essential steps, from understanding the reasons for cancellation and preparing your account to the actual cancellation process, and finally, managing post-cancellation actions.
It’s crucial to back up your data, communicate with your team, and ensure you’ve received confirmation of your cancellation.
Remember, you can rest assured of a smooth transition when you understand QuickBooks’ policies on refunds and data retention. If you encounter any hurdles, QuickBooks customer support is there to assist you through the process.
Making an informed decision is paramount. Whether it’s due to changing business needs, cost considerations, or seeking alternative software options, ensure that your choice aligns with your business’s goals and operations.